Quick & Easy Peppermint Bark: Your Go-To Holiday Dessert Recipe
As the festive season approaches, certain scents and flavors instantly transport us to cherished holiday memories. For many, that iconic aroma is the invigorating dance of peppermint and rich chocolate, culminating in the satisfying crunch of homemade peppermint bark. This isn't just another treat; it's a timeless tradition, a burst of seasonal joy, and remarkably, one of the simplest yet most impressive holiday desserts you can whip up. Forget complicated baking projects – our quick and easy
peppermint bark recipe is designed to bring smiles, make gifting a breeze, and fill your home with the undeniable spirit of Christmas.
Growing up, the kitchen transformed into a confectionery wonderland when it was time to make peppermint bark. The excitement of crushing candy canes, the allure of melting chocolate, and the promise of that first minty bite created an anticipation that was almost as delicious as the bark itself. It’s a memory-making activity that transcends generations, proving that the simplest ingredients can create the most profound holiday magic. So, whether you're a seasoned chef or a holiday novice, get ready to dive into the ultimate guide for crafting a spectacular
peppermint bark recipe that will be your go-to for years to come.
Why Peppermint Bark is Your Holiday MVP (Most Valuable Present/Dessert)
Peppermint bark has earned its place as a holiday staple for countless reasons, making it the undeniable Most Valuable Present (and Dessert!) of the season. Its appeal lies in a harmonious blend of simplicity, versatility, and irresistible charm. Unlike many holiday desserts that demand precision, special equipment, or advanced baking skills, peppermint bark is incredibly forgiving and fun to make. You don't need to be a pastry chef to achieve stunning results; just a few quality ingredients and a sprinkle of festive cheer.
One of its greatest superpowers is its ease. With minimal ingredients and no baking required, you can create a batch of gourmet-looking candy in under an hour (plus cooling time!). This makes it perfect for last-minute party contributions, thoughtful homemade gifts, or simply satisfying a sudden craving for something sweet and minty. The process itself is a delightful sensory experience – the gentle melt of chocolate, the vibrant red and white of crushed candy canes, and that unmistakable, invigorating peppermint scent that instantly makes your kitchen smell like Christmas morning.
Beyond its ease, peppermint bark carries a beautiful sense of nostalgia. It evokes memories of childhood, family gatherings, and the simple joys of the holidays. Its rustic elegance means it looks fantastic whether broken into charming shards or neatly cut into squares, ready to be presented in a decorative tin or cellophane bag. From kids marveling at the vibrant layers to adults savoring it with a hot cup of biscoff hot chocolate or a rich coffee, peppermint bark truly appeals to all ages. It’s more than just a sweet treat; it’s an edible memory, a conversation starter, and a true symbol of holiday comfort. For more on how this treat became a cornerstone of holiday giving, explore why it's a
Classic Peppermint Bark: The Ultimate Holiday Tradition & Gift Idea.
Essential Ingredients for the Perfect Peppermint Bark Recipe
The beauty of a classic
peppermint bark recipe lies in its reliance on just a handful of quality ingredients. While the list is short, making smart choices here will elevate your bark from good to truly exceptional.
1. **Chocolate, Glorious Chocolate:** This is the soul of your bark, so choose wisely.
* **Dark or Semi-Sweet Chocolate (for the base):** Aim for a high-quality baking bar or couverture chocolate with 60-70% cocoa solids. Brands like Ghirardelli, Lindt, or Callebaut offer excellent flavor and melt beautifully. Avoid chocolate chips if possible, as they contain stabilizers that can affect melting consistency and the final "snap." If using chips, ensure they are high quality.
* **White Chocolate (for the top layer):** Again, quality is paramount. Look for real white chocolate made with cocoa butter, not just sugar and palm oil (often labeled as "white confectionery coating" or "candy melts"). Real white chocolate has a richer, creamier texture and a much better flavor. Brands like Valrhona or Guittard are fantastic.
* **A Word on Candy Melts:** While tempting for their ease of melting, candy melts often lack the depth of flavor and the satisfying snap of true chocolate. For the best taste and texture, stick with good quality baking chocolate.
2. **Peppermint Extract:** This is where the minty magic happens. Use a good quality pure peppermint extract. A little goes a long way, so measure carefully! Peppermint *oil* is even more potent, so if you use it, reduce the amount significantly (usually by half or more) to avoid an overwhelming menthol flavor.
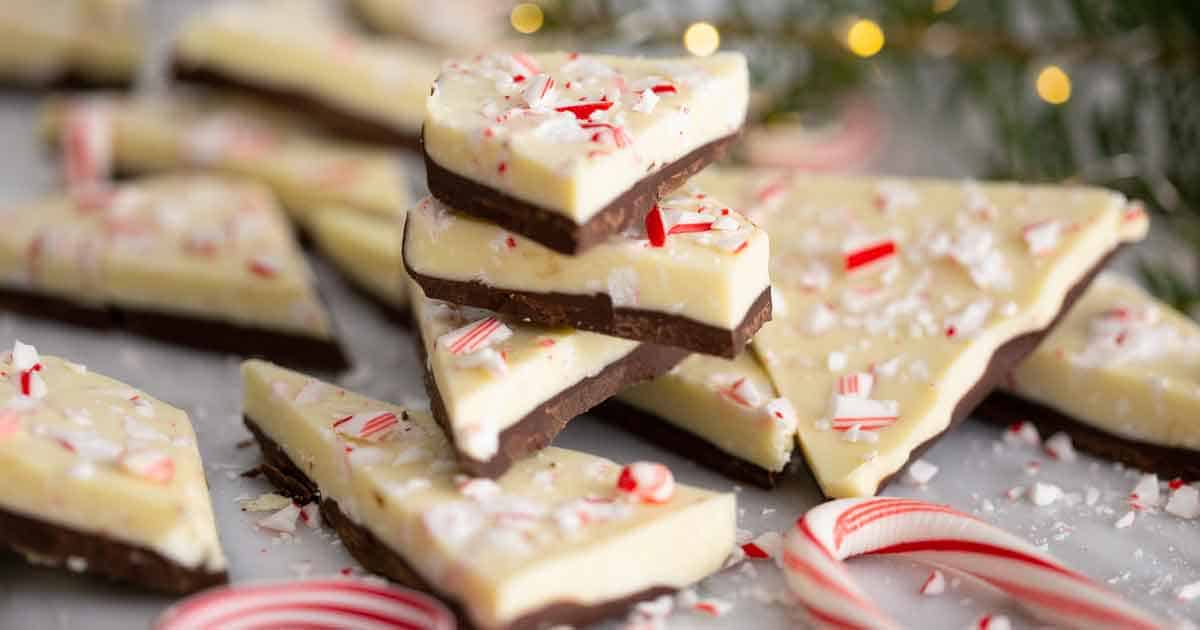
3. **Candy Canes:** The quintessential topping!
* **Crushing:** Place unwrapped candy canes in a zip-top bag and crush them using a rolling pin, a meat mallet, or even the bottom of a heavy pan. Aim for a mix of fine dust and small, chunky pieces for visual appeal and textural variety.
* **Quantity:** You'll need about 1 cup of crushed candy canes for an average batch, but feel free to add more or less to your preference.
Remember, investing in good quality chocolate will pay dividends in the final taste and texture of your homemade peppermint bark.
Step-by-Step Guide: Crafting Your Easy Peppermint Bark Recipe
Creating this delightful holiday treat is incredibly simple. Follow these steps to achieve a perfectly layered, crunchy, and minty
peppermint bark recipe every time.
**Ingredients You'll Need:**
* 16 oz (about 2 ¾ cups) good quality dark or semi-sweet chocolate, chopped
* 16 oz (about 2 ¾ cups) good quality white chocolate, chopped
* 1 ½ teaspoons pure peppermint extract (or ¾ teaspoon peppermint oil)
* 1 cup crushed candy canes
**Equipment:**
* Large baking sheet (approx. 10x15 inches or similar)
* Parchment paper or silicone baking mat
* Heatproof bowls (2)
* Saucepan for double boiler method (optional)
* Spatula or spoon
**Instructions:**
1. **Prepare Your Workspace:** Line your baking sheet with parchment paper or a silicone baking mat. This is crucial for easy removal of the finished bark.
2. **Melt the Dark Chocolate:**
* **Double Boiler Method:** Fill a saucepan with about an inch of water and bring it to a simmer. Place a heatproof bowl with the chopped dark chocolate over the simmering water, ensuring the bottom of the bowl does not touch the water. Stir gently and continuously until the chocolate is completely smooth and melted. This method provides gentle, even heat and is less likely to scorch the chocolate.
* **Microwave Method:** Place chopped dark chocolate in a microwave-safe bowl. Microwave in 30-second intervals, stirring thoroughly after each interval. Continue until the chocolate is smooth and melted. Be careful not to overheat, as chocolate can seize quickly.
3. **Add Peppermint to Dark Chocolate (Optional):** Once melted, stir ½ teaspoon of peppermint extract into the dark chocolate. This adds a subtle minty note to the base layer.
4. **Spread the Dark Chocolate:** Pour the melted dark chocolate onto the prepared baking sheet. Using an offset spatula or the back of a spoon, spread it into an even layer, about ¼ inch thick. Try to get it as uniform as possible.
5. **Chill the Dark Chocolate:** Place the baking sheet in the refrigerator for 15-20 minutes, or until the dark chocolate layer is firm to the touch. Do not allow it to fully harden or it may crack when you cut it later.
6. **Melt the White Chocolate:** While the dark chocolate chills, melt the white chocolate using either the double boiler or microwave method described above.
7. **Add Peppermint to White Chocolate:** Once the white chocolate is fully melted and smooth, stir in the remaining 1 teaspoon of peppermint extract (or ½ teaspoon oil). Mix well to combine.
8. **Layer the White Chocolate:** Remove the chilled dark chocolate from the refrigerator. Pour the melted white chocolate evenly over the dark chocolate layer, spreading it quickly with an offset spatula. Work efficiently, as the cold dark chocolate will start to set the white chocolate.
9. **Sprinkle Candy Canes:** Immediately and generously sprinkle the crushed candy canes over the top of the white chocolate layer. Gently press them down with your hand or the back of a spoon to ensure they adhere.
10. **Chill to Set:** Return the baking sheet to the refrigerator for at least 30-45 minutes, or until both layers of chocolate are completely firm and set. You can also leave it at room temperature for 2-3 hours, especially if your kitchen is cool.
11. **Break and Serve:** Once fully set, carefully peel the parchment paper away from the hardened bark. Break the bark into irregular pieces or use a sharp knife to cut it into squares or rectangles.
Voila! Your homemade peppermint bark is ready to be enjoyed or shared.
Elevate Your Peppermint Bark: Tips, Tricks & Creative Twists
While the classic
peppermint bark recipe is a showstopper on its own, a few insider tips and creative variations can truly elevate your creation, turning it into a gourmet treat that rivals any confectionery shop.
* **The Perfect Snap:** The secret to that satisfying "snap" lies in using high-quality chocolate and ensuring proper setting. Avoid quick temperature changes (like moving from a very warm kitchen directly to a very cold fridge) if possible, as this can sometimes lead to a slightly softer texture or blooming (white streaks). Letting it set slowly in a cool room is ideal, but the fridge works well for speeding things up. For more advanced techniques and troubleshooting, check out
Peppermint Bark Pro Tips: Master the Perfect Snap & Flavor for Gifts.
* **Tempering for Gloss & Stability (Advanced):** For truly professional results (and bark that is less prone to melting at room temperature), consider tempering your chocolate. This involves carefully controlling its temperature during melting and cooling to stabilize the cocoa butter crystals. While not strictly necessary for a home cook, it results in a beautiful glossy finish and a firmer snap.
* **Creative Toppings Beyond Candy Canes:**
* **Sprinkles:** Add festive red, green, or silver sprinkles along with or instead of candy canes for extra sparkle.
* **Nuts:** Chopped pistachios or almonds can add a delightful crunch and nutty counterpoint to the mint.
* **Other Candies:** Crushed Oreos, mini chocolate chips, or even a drizzle of caramel can introduce new flavor dimensions.
* **Sea Salt:** A sprinkle of flaky sea salt over the dark chocolate layer before adding the white chocolate can enhance the chocolate's depth and cut through the sweetness.
* **Flavor Variations:**
* **Mint Swirl:** Instead of entirely peppermint white chocolate, drizzle some plain melted white chocolate over the dark layer, then add drops of green-tinted, peppermint-flavored white chocolate and swirl with a skewer for a marbled effect.
* **Espresso Kick:** Add a teaspoon of espresso powder to your dark chocolate for a mocha-mint twist.
* **Citrus Burst:** A touch of orange zest or extract in either chocolate layer can create a refreshing chocolate-orange-mint combination.
* **Storage Savvy:** Store your peppermint bark in an airtight container at room temperature for up to 2-3 weeks, or in the refrigerator for up to a month. If refrigerating, let it come to room temperature for a few minutes before serving for optimal flavor and texture. It also freezes beautifully for up to 3 months!
* **Gifting Gold:** Peppermint bark makes an exquisite homemade gift. Package it in clear cellophane bags tied with festive ribbons, stack it in decorative tins, or arrange it in small gift boxes. Add a handmade label with a personal message, and you've got a heartfelt present that everyone will adore.
This customizable holiday treat is a fantastic way to express your creativity in the kitchen while producing something truly delicious.
In conclusion, the appeal of a homemade
peppermint bark recipe transcends its simple ingredients and straightforward process. It’s a testament to how humble components can come together to create something truly magical and memorable. Whether you’re seeking a last-minute dessert, a delightful edible gift, or simply a fun holiday activity to share with loved ones, this festive treat delivers on all fronts. With its irresistible blend of rich chocolate, cool peppermint, and satisfying crunch, peppermint bark is more than just a candy – it's a cherished holiday tradition waiting to be made in your kitchen. So gather your ingredients, turn on some holiday tunes, and prepare to make some holiday happiness, one delicious, minty-chocolate shard at a time.